137 drills match your filters

Footwork
2 Minute Closeouts
Video by BreakthroughBBall
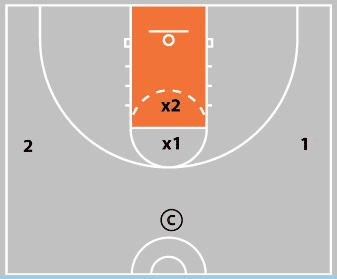
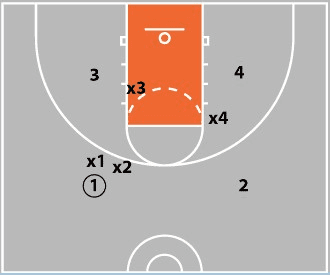
Two minute closeouts is a great daily drill to build good defensive habits. Players get multiple reps of closeouts, as well as jumping to the ball. It’s a good warmup drill to ingrain proper defensive techniques. Coach starts out with the ball at the top of the key 2 players (or other coaches) are on each wing A line of defensive players is under the rim. The first 2 players are on the midline (Diagram 1) (Diagram 2) Coach passes to 1 x1 closes out to 1 1 passes to 2 x2 closes out to the ball x1 sprints middle x1 steps off (Diagram 3) (Diagram 4) x3 take’s x1 spot in the middle. X3 should run into the correct help position spot One progression of the drill is to make it 4v4. This allows you to include more players and guard different spots on the floor. Now the drill is 4 on 4 Coach starts with the ball Players 1-4 are on offense Players x1-x4 are on defense Coach passes to 1 x1 closes out on the ball (Diagram 5) (Diagram 6) x2 fills the gap x3 and x4 jump into the midline. They should communicate their positioning to the x1 & x2. 1 passes to 3 x3 and x4 shift to the left side. The defender must move on the flight of the pass. (Diagram 7) (Diagram 8) x1 and x2 shift middle. x1 & x2 need to sprint to their help spots. If they slide, they will be too slow. x1 and x2 step off 5 and x5 step on The drill is continuous Place an emphasis on proper footwork and closing out hard. Individual coaches have varying preferences on technique. Whatever yours is, enforce it. The drill also works on defensive positioning one pass away from the ball. Player must jump to the ball on every pass. Onthe catch the offense should fake and/or jab at the defender. They should be inan athletic position. Offensive players shouldn’t go through the motions. Take away shot first with a high hand and then bring hands down to the side when taking away the drive When the ball is brought low by the offensive player, the defense needs to give a little space in case there is a drive (Diagram 9) Depending on your numbers, use both ends of the court to get more reps Made by Breakthrough Basketball
Passing
4 Corners Passing
Video by BreakthroughBBall
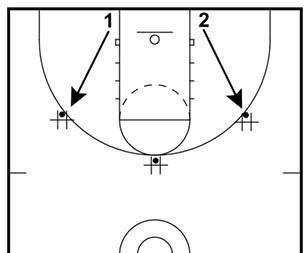
Trapping is a huge part of defensive pressure and must be worked on daily. Teams with bad spacing are easier to trap. Bury the player you are trapping by getting your bodies all over them and getting your hands in the face to block vision. Likewise, good players accept traps without panicking and are able to pass effectively out of traps. This drill works on both sides of that equation. Position 4 offensive players in a square shape. 4 defensive player line up in between the offensive players Pass the ball to any offensive player to start. The closest 2 defenders trap. The offensive player must hold the ball, allowing the trap Defenders should lock or overlap feet to avoid being split. Do not jump unless the offense has jumped first (Diagram 1) The other two defenders (x3 and x4) space between the three offensive players 1 passes to 2 2 waits until defense comes over to trap before passing ball again x2 and x4 trap the ball now x1 and x3 slide to the middle to anticipate any passes Go for :30 and switch, tracking deflections and steals Make the drill harder for the defense by not requiring the offensive players to wait and be trapped. The defense must move on the pass to get the trap set. Make the square larger to make it harder for the defense (and vice versa). Penalize reaching fouls by the defense. Encourage them to get body to body with the offensive player and then mirror the ball with their hands (not reaching in). The two interceptors should read the shoulders of the passer and cheat that way. (Diagram 2) Passers should use fakes and look to pivot into the defense to create space to find a passing window. Made by Breakthrough Basketball
Footwork
Full Court 1v1 W/Close Out
Video by BreakthroughBBall
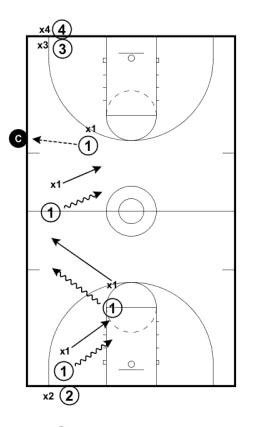
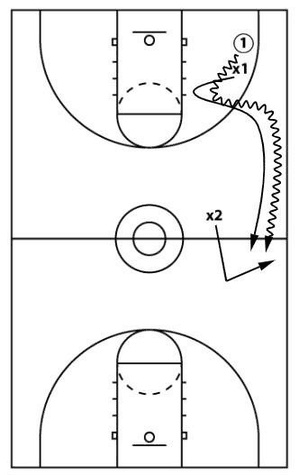
This is an alternate way to work on guarding the ball 1v1. Instead of guarding a live dribbler from half court, the defender has to closeout on the offensive player and then prevent them from scoring. Offense and defense start on the baseline. The offensive player has a ball. (Diagram 1) The offensive player tries to beat the defender down the floor. The defender tries to turn the ball as many times as possible. Once the ball crosses half court, the offensive player passes to a coach who’s on the sideline. After passing to the coach, the offensive player sprints and touches half court. The defender sprints and touches the baseline. The coach passes to the offensive player. The defender closes out. 1 & x1 play 1v1 The defender should close out with an understanding of who they are guarding. Good shooters require a closer closeout while drivers should be played with space. Make sure players close out with the stance angle you teach in your zone. (Diagram 2) Encourage the offensive player to attack on the catch - make holding the ball a turnover. Made by Breakthrough Basketball
Team Play
Complete Man To Man Drill
Video by BreakthroughBBall
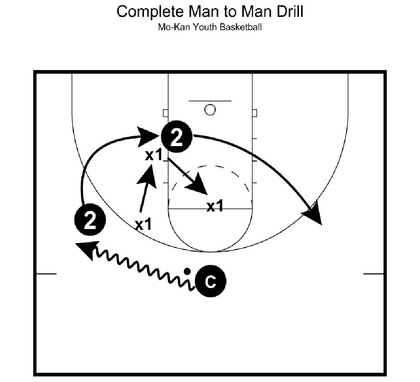
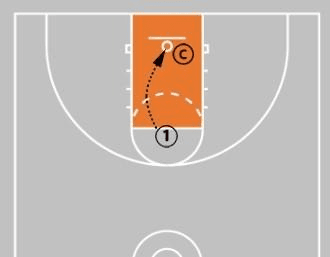
This defensive drill is superb for transitioning between the different positions on the floor to defend many situations. You transition from 1 pass off the ball, 2 passes off the ball positioning, defending the post, defending flash cutters, closing out, and helping on dribble penetration. Also, as a defender, you can’t hide in this drill. You are out on an island and you must fully understand where you should be positioned at all times. Acoach, manager, or player is positioned at the top of the key. A defender (X1) is guarding a player on the wing (2). Coach starts up top with the ball. Defense X1 is in 1 pass away position on the line, up the line. Coach will dribble to the wing and the offensive player 2 will rotate into the post. X1 will take them on in a ¾ front in the post. (Diagram 1) Offense 2 will vacate the post and move the weak side wing. X1 should be in a 2 pass away help position with the ball on the opposite wing with Coach. Offense will flash cut, defense will pick them up and try to force them up the lane to catch away from the paint. If the offense goes back door on the cut, we swivel and pick them up, hand in the passing lane. Once the offense catches the ball, you are live one on one. Up the Line, On the Line – Up the line, on the line means forming a flat triangle, halving it between the ball and the player they are guarding. Have a hand on the imaginary string between the ball and your player. Not past the string, ON it. Past it will get you beat back door, as your body will be too high and out of position. See Player & Ball – When positioned, you should always have your eye on the player with the ball and the player you are guarding. You have to be aware of the ball, so you can position yourself properly to help on defense. You also need to be in the right position, so you can defend your player if a pass is received. If you just watch the ball, it’s easy for your defender to cut to an open spot on the floor for a scoring opportunity. Step In Front Of Cutter – Don’t let the flash cutter receive the pass. Be sure to cut them off. You don’t want any penetrating passes within the 3-point arc. (Diagram 2) Mix Up Cuts & Positions – You can also tell the offensive player to randomly give the defensive player different looks. This is a good progression because it is more game-like as the defender has to react similarly to a game rather than just learn the sequence. You might tell the offensive player to choose three or four different cuts and positions at random. Fake Dribble Penetration – Make sure that the person with the ball fakes dribble penetration periodically throughout the drill. This ensures that the defender is watching the ball and the player they are guarding at the same time. Don’t Depend On Drill – You shouldn’t depend on this drill as a way to defend. The real test is when you are defending with other players on the court. However, it is a good variation to use in practice to initially learn defensive habits. You can also use it as a variation to quickly review defensive principles. Made by Breakthrough Basketball
Reaction
1 v 2 Trapping
Video by BreakthroughBBall
This is a must drill for teams that use a 2-2-1 press. Part of the 2-2-1 is luring players into the desired trapping area at half court. This drill teaches your guards to funnel the ball up the sideline while your second line defenders work on “dancing” to set the trap. 1 starts with the ball on one side of the floor. X1 assumes a stance that funnels 1 up the sideline. X2 is positioned near half court on the same side. (Diagram 1) 1 looks to beat the defense by splitting the defenders or by beating them down. X1 & x2 look to trap 1 just across half court. This prevents 1 from being able to dribble or pass backwards. (Diagram 2) Tip: Dancing means that x2 fakes up and back. This is done to make the ball handler indecisive. They are unsure whether to pass or dribble up the floor. You can also have the ball in bounded to 1 to work on x1 forcing the ball back to the corner. Made by Breakthrough Basketball
Passing
Monkey in the Middle
Video by BreakthroughBBall
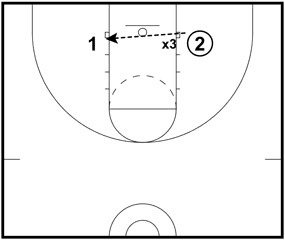
Two players are on offense. One player in the middle is the monkey and is on defense. Offensive players pass the ball back and forth. They use fakes to get the ball past the defender. No lob passes are allowed. Wait for the defender to recover to the offense before throwing the next pass. (Diagram 1) (Diagram 2) When the defender tips a pass, the passer goes to be the monkey in the middle. Made by Breakthrough Basketball
Conditioning
Man In The Hole
Video by BreakthroughBBall
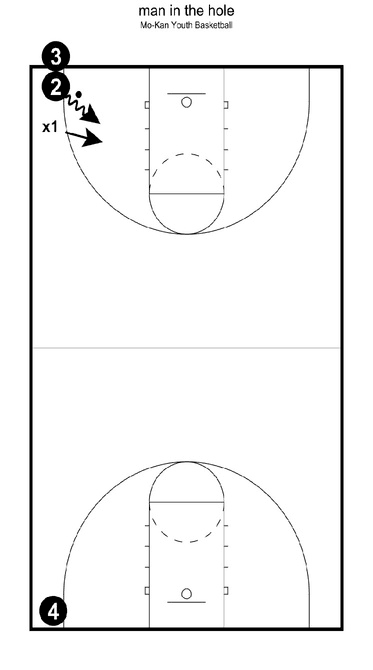
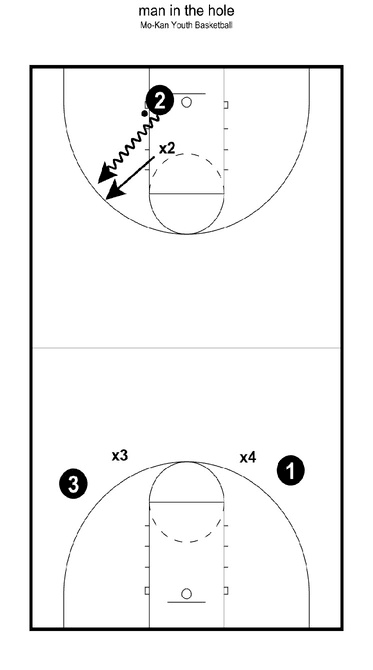
Even if you play half court or quarter court defense, this should be a staple for every coach. This is a great 1 on 1 transition drill that works on your ability to stay in front of a ball handler in the open court. You work on the shuffle, the quick turn, running, and the turn and sprint to recover. Additionally, it’s great for conditioning and building mental toughness. It not only improves your 1v1 full court defense, it improves overall athleticism and conditioning. When you have to shuffle, sprint, change directions over and over, you’re going to improve athleticism and reaction time. Even zone defense coaches use drills like these because of the tremendous benefits that they produce. The ball hander (2) has the ball on the baseline. The defender (X1) is standing in front of the offensive player ready to play defense. (Diagram 1) The offensive player (2) tries to beat the defender (X1) down the floor. The defensive player tries to stop the ball handler from advancing the ball. After the ball handler (2) makes it to the other end, they will hand off to 4, who will be facing the same defender X1, backup the court towards player 3. 3 is the last ball handler. X1 defends for the third and final time. X1 is now“out of the hole”and you rotate to the next defender. X1 is now the next ball handler. Stop The Ball – The number one goal is to stop the ball from advancing. Push Step & Sprint – The defensive player should push step (shuffle) and sprint to contain the ball handler. If the defender gets beat, they need to turn and sprint to a spot to cut off the ball handler. Offense Practices Good Habits – The offense also needs to focus on good habits of protecting the ball and using effective change of pace and change of direction moves. Go Back To Where Defender Was Beat – If the offense gets by the defender, don’t let them just turn and jog to the other baseline. Have the defender and offensive player go back to where they got beat. This will ensure focus and effort to stop the ball. Encourage Players – Encouragement and energy from the Coach can help keep a player going in a drill like this. Get involved and work with them! Split The Court – Be sure to split the court into alleys. You can set up three to four alleys on each court. This allows you to work the entire team with this drill. You can use cones or other lines on the court. Made by Breakthrough Basketball
Passing
5v0 Pass & Cut
Video by BreakthroughBBall
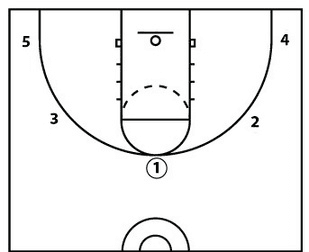
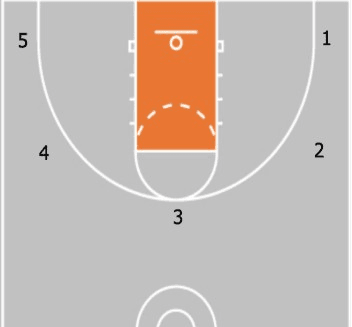
The first variation of this drill starts with basic passing and cutting. Players start in their 5 out spots. Or instead of using "spots" we just tell players to fill and space on the the 3 pt line. Then players simply run their offense without taking shots. You want players making good passes, catching in triple threat position, and executing the fine details of your offense. Players can pass to the left or right. In this example, 1 passes to 2. 1 cuts to the basket. 3 and 5 then replace the open areas. (Diagram 1) (Diagram 2) (Diagram 3) 1 doesn't get the ball so he fills the open spot in the corner. 2 passes to 3. 2 cuts to the basket and 4 fills the open area. 2 then clears to the open corner. 3 passes to 5 and cuts to the basket. The continuity continues. Cut hard all the way to the basket. Look for the ball as you cut. Player with the ball should watch the cutter. No banana (rounded) cuts -- crisp cuts only. (Diagram 4) (Diagram 5) Use hand signals when filling so passer knows if you're popping out or back cutting. Made by Breakthrough Basketball
Passing
5v0 Pass & Pick Away
Video by BreakthroughBBall
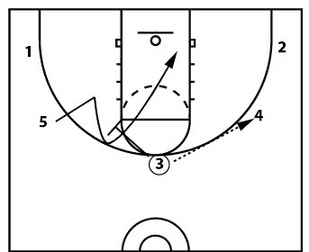
In this example, players will screen away and curl every time they pass the ball. 3 passes to 4. 3 screens away for 5. 5 sets up the screen and then curls to the basket. After screening 3 opens up to the ball. 1 fills the open spot. And 5 clears to the corner. The screening process can continue as the ball is passed around. Call out your screen verbally and visually (with fist). Set up your screen. Cutter comes off shoulder to hip. Cutter curls all the way to the backboard and then finds an open spot. (Diagram 1) (Diagram 2) For good timing and quick passing, the screener must pop as the screener brushes their shoulder and cuts to the ball aggressively (sprint back to the same spot you came from). Made by Breakthrough Basketball
Shooting · Footwork
Figure 8 Shooting
Video by BreakthroughBBall
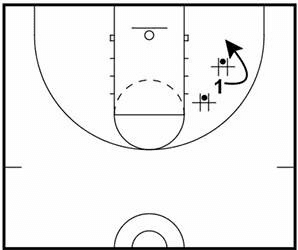
This is a great drill to work on footwork and shooting. It combines front pivots and shooting in a game-like way. It requires 2 chairs & 2 basketballs. Put 2 chairs on the wing. Place a ball in each chair. Player 1 starts in between the chairs. They will run around the right chair, pick up the ball, and front pivot into a jump shot. 1 then between the chair and around the left chair. Again, they grab the ball, front pivot, & shoot. (Diagram 1) (Diagram 2) The player continues the pattern for 10 shots, then repeats on the other side. 1. The shooter should stay low and make a hard front pivot into their shot. 2. The drill is best done with a partner rebounding and replacing the basketballs. 3. Adjust the shooting distance to the player’s experience and ability. Made by Breakthrough Basketball
Footwork · Shooting
Chair Pivots
Video by BreakthroughBBall
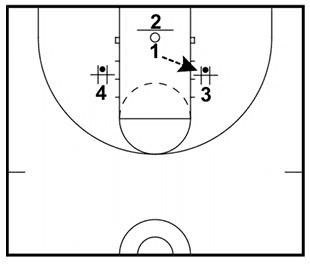
This is a great drill to develop comfort with all the pivots that make up the attack & counter system. Players can get reps at every pivot and every counter. You can also vary the finishes to work on what your player needs. Doing this drill close to the hoop allows players to get more reps in a short period of time, even though the footwork is exactly the same on the perimeter. You need 2 chairs & 2 basketballs. Place a chair on each side, just above the block. Place a ball in each chair. 1 is the shooter. 2 rebounds. 3 & 4 replace the balls. 1 starts under the hoop. They sprint to the chair and jump stop, grabbing the ball and getting in triple threat. 1 will then make a specific pivot from the list below & score. After scoring, 1 sprints to the opposite chair and repeats the process. (Diagram 1) (Diagram 2) The other players rebound and replace the balls. 1 will continue the pattern for a set number of shots (10) or time (1:00), performing the same pivot. Players then switch roles. (Diagram 3) 1. Players should perform reps of the following pivots during this drill: a. Front pivot - baseline foot b. Front pivot - top foot c. Inside pivot - baseline foot d. Inside pivot - top foot e. Drop step - baseline foot f. Drop step - top foot g. Front pivot, step thru - baseline foot h. Front pivot, step thru - top foot i. Drop step, inside pivot - baseline foot j. Drop step, inside pivot - top foot k. Inside pivot, sweep - baseline foot l. Inside pivot, sweep - top foot m. Combo pivots 2. The top foot is the foot closest to the key & baseline foot closest to the baseline. 3. You can make the drill 1v1 after players have practices without defense. Made by Breakthrough Basketball
Ball Handling · Footwork
Ball Screen Reads
Video by BreakthroughBBall
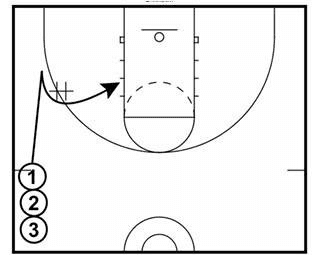
This drill is a great drill to work on different ball screen reads. Players get reps attacking common ball screen coverages. They learn the ball handling and footwork combinations that work against each coverage, giving them comfort and confidence in games. You need 2 chairs (1 to be a defender, and 1 to be screen) (Diagram 1) Line players up at half court on the sideline. Each player has a ball. 1 dribbles below the screen to set their player up. 1 attacks off the screen and shoots a jumper or layup. 2 goes when 1 clears the screen. (Diagram 2) Once again 1 will dribble below the screen to set up the ball screen. We now pretend the on ball defender cheats towards the screen. 1 fakes like they are using the screen but then attacks back towards the baseline. In this scenario you will simulate a hedge (hence the 2nd chair). 1 dribbles below the screen to set up the defender. 1 then uses the screen and drags the hedger wide towards the center of the court. 1 should use a change of pace to get by the hedger (generally a big). 1 shoot a jumper or a layup. (Diagram 3) (Diagram 4) This is a 2nd hedge scenario. After setting up their defender, 1 comes off the screen. We assume there is a gap between the screen and the hedger. 1 fakes over the top before splitting the chairs. 1 should push the ball out to create space for a layup. Perform each scenario 4-6x on each side. Add in guided defense to force 1 to make a read based on how the screen is defended. Vary the types of shots & finishes players take in the drill. Made by Breakthrough Basketball
Conditioning
1v1 to 3v3 Full Court
Video by BreakthroughBBall
Being able to defend the ball in a one on one situation is vital. However, you need to have the capability to transition into help defense in a team setting! This drill is about building great 1 on 1 full court defense habits and transitioning into a half court setting. Then you work on all other aspects of your defense. Defending cuts, screens, getting into help position, stopping dribble penetration, etc. 3v3 defensive drills are also great because it’s tougher to defend the entire court with three players than with five players like during a game. Additionally, the offense learns how to handle the ball under pressure and improve passing. (Diagram 1) You have the ball handler start on the baseline. You have the defender guarding them. Two offensive players and two defensive players are set up on the opposite end of the floor. The defense’s goal is to get a stop. Their goal is to only allow one shot each possession. The offense’s goal is to score. The ball handler (2) advances the ball and tries to beat the defender (X2). Once the ball is dribbled past half court, it is a “live” 3 on 3 situation. After each possession, the defense turns to offense. Then they check the ball on the baseline and start over. Contain Ball – Your goal as a defender now is contain the ball. You do not allow straight line drives. You want to stay between your player and the basket! Wing Defenders Deny Pass – Defenders X3 and X4 are going to deny the pass on the wing and make it difficult to catch. Help And Recover – The defenders have to be ready to help and recover should the ball handler get past the initial defender. Help Across Not Up – If the ball handler beats the initial defender, the other defender, X3, is going to have to find a way to help slow the ball to give the recovering teammate time to get back. They should help “across” from their own player and keep the ball and their player in their line of sight. Try to stop the ball on the same level as your own player if possible. Helping “up” the court from your player in this situation will lead to the easy bucket on the lob ahead. Force Contested Jump Shots / No Lay Ups – Your Goal? Do not let the other team score! You do that by keeping the ball as far away from the basket as possible. Lay ups are NOT allowed! You want a contested jump shot as far from the basket as possible, with as much pressure and difficulty as possible. Force Turns Prior To Half Court – If you want to make the drill really challenging for the full court defender, you can reward them for the number of times that they force the ball handler to stop and change directions. Each change of direction is worth one point. Once they reach half court, it goes back to playing defense straight up. Also, this can be a similar strategy to use against teams that lack effective ball handlers or if you have some superb 1 on 1 full court defenders. Defense Stops – One effective tactic to get players to focus on the defensive end is to only allow them to transition to offense by getting a defensive stop. If they don’t get a stop, a new group of defenders comes in to stop the ball. If you score on offense, you stay on the court. Winner Stays – You can set up teams of three and play to a determined amount of points. The winners stay on the court. Made by Breakthrough Basketball
Shooting · Footwork
Chair 1v1
Video by BreakthroughBBall
This is a fun shooting game that combines attack & counter shooting footwork with the same footwork in a 1v1 context. It forces players to go game speed on their shooting, and then read the defense as they transition to 1v1. It requires 3 chair & 3 basketball. 1 & 2 start on the baseline. 3 chairs are set up on the wings and the top of the key. Each chair has a ball. On “go,” both players run to the chair on their side, pivot and shoot. If they make the shot, they are awarded 2 points. After shooting, players race to the chair at the top of the key. Whoever gets the ball 1st is on offense. The offense has 2 dribbles to score. (Diagram 1) (Diagram 2) Baskets are worth 1 point. 1. Games are up to 5. 2. Every time players reset, they should switch which side they start on. 3. On the initial shot, you can prescribe a certain pivot or allow players to choose. 4. As players get to the ball for 1v1, they should scan to see where the defender is. That allows them to quickly utilize the proper footwork and attack. Made by Breakthrough Basketball
Shooting · Warm-up
Partner Shooting
Video by BreakthroughBBall
Partner Shooting is a great drill to warm up. The first minute is critical as it allows you to hone your form inside the arc before you move back to the 3 point line. 1 shooter, 1 rebounder, 1 ball (Diagram 1) For the first minute, shoot catch and shoot shots from the free throw line. (Diagram 2) For the second minute, move back to the top of the key and shoot 3’s. For the last minute, shoot 3’s, moving between each shot. Work on your shot prep. Make sure you show your hands to the passer. Be down and ready to shoot. Vary your footwork as you perform this and all the other drills. One time hop on every catch. One time step into the pass. Develop comfort with all types of footwork. (Diagram 3) Mix up running and sliding as you move in the 3rd minute. Whichever you do, don’t hug the 3 point line. Move with a slight arc so that you have a good angle to turn and step into your shot. Made by Breakthrough Basketball
Shooting · Conditioning
20 Shooting
Video by BreakthroughBBall
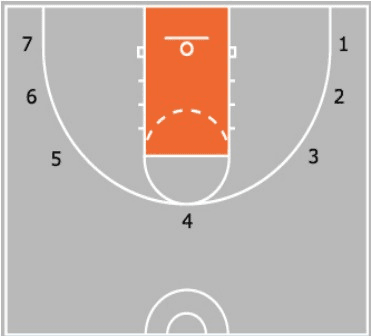
20 shooting is a really tough shooting drill. Track your score over time and see how you improve. You will use 5 shooting spots. Corners, wings & top of the key. You must make 3 in a row from each of the 5 spots. When you reach the opposite corner, the goal is to make 5 in a row coming back (1 from each spot). You have 2 minutes to complete the drills. (Diagram 1) You get 3 points for each spot you get through in round 1 plus how far you get back on round 2. If you made it through all 5 spots for round 1 and 2 spots in round 2, your score would be 17. Hold your follow through. It’s easy to rush because of the time element. Be quick but don’t hurry. Stay positive. This is a mental drill, too. It’s easy to get frustrated if you miss some shots, but work on a ‘next shot’ mentality. Made by Breakthrough Basketball
Shooting · Conditioning
14 in :90
Video by BreakthroughBBall
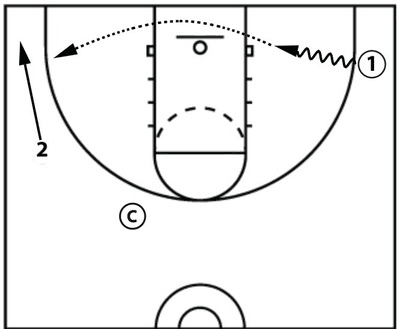
This is another drill that puts some time pressure on you. Track your score. This drill uses 7 spots - corners, low wings, high wings, & top of the key. (Diagram 1) You must make 2 in a row to move to the next spot. Your goal is to make it from spot 1 through spot 7. If you make it through all 7 spots, shoot at the top of the key and add to your total score. Each of the 7 spots is worth 2 points. Individual makes don’t count, you only get points for completing a spot. Each 3 you make after making it through the 7 spots is an additional point. You have :90 to complete the drill. Hold your follow through. It’s easy to rush because of the time element. Be quick but don’t hurry. Stay positive. This is a mental drill, too. It’s easy to get frustrated if you miss some shots, but work on a ‘next shot’ mentality. Sprint spot to spot. You must maximize the time allotted. Be shot ready to get off as many shots as possible. Made by Breakthrough Basketball
Passing · Shooting
2 Man Hammer Pass
Video by BreakthroughBBall
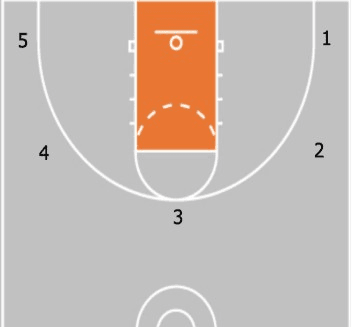
The Hammer action was popularized by the San Antonio Spurs and is a common setrun in the NBA This action is intended to generate an open corner three-pointer 1 attacks baseline then passes to 2 2 moves to the corner to receive pass from 1 Goal should be for 2 to line up directly to 1’s line of sight for the pass (Diagram 1) (Diagram 2) 2 takes the shot. 1 relocates to 2’s previous spot to receive the pass from coach to take the shot Made by Breakthrough Basketball
Shooting
Big Shot
Video by BreakthroughBBall
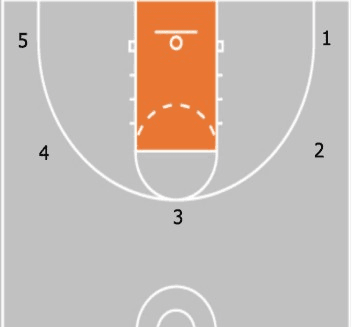
Big Shot changes up the pressure mechanism. Instead of the pressure being applied by time, it’s applied by misses. Theoretically, you could shoot forever in this drill. Make that your goal! This drill uses 5 spots - the corners, the wings, & the top of the key. 1 ball, 1 rebounder (Diagram 1) Shoot from player 1 until you miss 2 shots in a row. Once you miss 2 in a row, move to spot 2. Continue with that pattern through all 5 spots. Every make is worth 1 point. Your score is your total number of makes accumulated over all 5 spots. Focus only on the shot at hand. It’s easy to get nervous after the first miss. Don’t let the last shot affect the next shot. Remember a rough start can be overcome by a great spot. Many players get discouraged by a bad start. Instead, view it as a challenge to overcome as you progress through the later spots. Maintain good form. Players tend to lose their form when they get tired. Stay disciplined as fatigue sets in. Made by Breakthrough Basketball
Shooting · Conditioning
Nuggets Drill
Video by BreakthroughBBall
Nuggets Drill is a great drill to work on our focus while integrating shooting on the move. It also adds a conditioning element to your workout. This drill uses 5 spots - the corners, the wings, & the top of the key. (Diagram 1) Start at spot 1. You must make 3 shots in a row at every spot. At spots 1 & 5, you will slide up towards the wing, then drift back to the corner. You’ll catch a pass and shoot a 3. (Diagram 2) At every spot, if you miss 2 shots in a row, you must sprint to the opposite baseline & back before the next shot. After making 3 in a row in the corner, move to the wing. At each wing spot, you’ll shoot transition 3’s. Sprint from the arc to the volleyball line. Sprint back to the wing for a catch & shoot 3. After making 3 in a row on the wing, go to the top of the key. Once again, you’ll shoot transition 3’s. Sprint from the top of the key to half court & back. Catch and shoot a 3. Aim for BRAD (back rim & down shots). As you get tired, this helps prevent you from coming up short. Focus on your footwork as your catch on the move. SPRINT your transition 3’s. The more game-like you make the shots, the more carry over you’ll see to your games! (Diagram 3) (Diagram 4) Your score is the time it takes you to make it through all 5 spots. Made by Breakthrough Basketball
Finishing · Ball Handling · Conditioning
Arc Finishing
Video by BreakthroughBBall
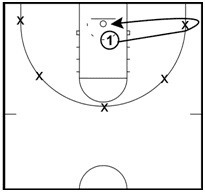
The following drill is a better way to simulate game situations where you will be coming from all different angles to shoot a lay-up. Step 1: Before you start the drill, you must set up 5 cones around the three point line (marked as X's on the diagram to the right). Start by dribbling with your right hand around the first cone and then come back to the basket to shoot a right handed lay-up. Step 2: As soon as you complete a lay-up around cone #1, you will progress to each one of the cones. Once you make a lay-up from each spot with your right hand, you will go back through each spot, this time shooting and dribbling with your left hand. By the end of the drill, you should have completed 10 lay-ups (5 right handed & 5 left handed). Extend the Ball: As soon as you get around the cone, extend the ball as you dribble to accelerate your pace to beat the defense to the basket. Chin Up / Eyes Up: When completing the lay-up, remember to get your chin up and your eyes on the basket. This will help you finish in traffic. (Diagram 1) (Diagram 2) Drive Your Knee To Your Nose: During your lay-up, drive your knee to your nose. This will help you get the maximum height out of your vertical leap & keep your body under control. Push Yourself: Make sure that you perform this drill full speed. You want to best simulate game situations, so dribble and move as you would during a game. By doing that, this also becomes a great conditioning drill. Variations: Use different finishing moves at the basket such as the Rondo, Euro, Runner, etc. Made by Breakthrough Basketball
Finishing
1v1 on Cone Touch
Video by BreakthroughBBall
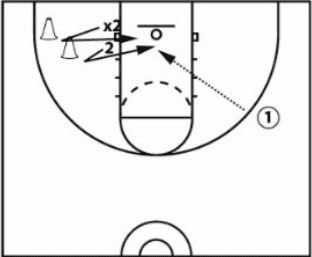
You will need a passer to practice this drill, unless you want to do it yourself then you can by setting a ball on a chair. If you have more players to work out with, you can also practice competitive situations. In this drill, you set up a pair of cones near the perimeter. When the offensive player moves forward, both players sprint to touch the cones. The passer throws the ball to the offensive player near the basket. Then it's live 1 on 1. I typically like to start the offensive player’s cone a little closer to the hoop. You can also tweak the cone distance, so the defender will arrive at different times. (Diagram 1) If working with a partner, I don’t like the defender to steal the pass in this situation. Made by Breakthrough Basketball
Shooting
Baseline Drive
Video by BreakthroughBBall
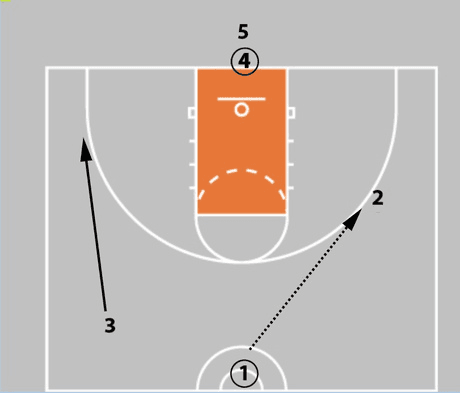
Team Shooting During this first variation, we are trying to get a baseline drive and drift. Then we want to get that drift to one more. We want a clean reversal from one side of the floor to the other, and then we hit the one more pass for the trailing shot. The goal is to shoot for doubles (each drill you can shoot for singles, doubles, or triples). A double is when two shots and two makes occur on a rep of the drill. 1. The drill starts with three lines of players. 2. The middle line starts with the ball. 3. The middle line should be behind ½ court. 4. Player 1 pitches ahead to Player 2. 5. Player 3 drifts to the coffin corner. 6. Player 2 drives the baseline and passes to Player 3. (Diagram 1) (Diagram 2) 7. Player 1 runs to the wing for the one more pass. 8. Player 3 executes the one more pass to Player 1 who shoots a 3-point shot. 9. Player 4 passes to Player 3 for another 3-point shot attempt. (Diagram 3) 1. Player 3 can make a shot fake before passing to Player 1. 2. The goal for Player 2 is to puncture the lane, getting into the lane, before passing to player 3. 3. Getting into the lane allows the opposite side to drift out for the three. 4. Have players rotate after every possession. 5. Wing line goes to the passer line. 6. Passer then sprints up to the guard line. 7. Guard goes to the wing line. 8. The goal of the primary break out situation is to force long closeouts. That is why the one more pass is so effective. Made by Breakthrough Basketball
Shooting · Passing
Pistol Action Team
Video by BreakthroughBBall
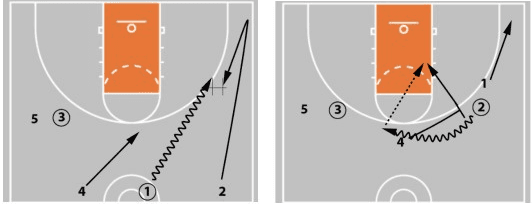
Shooting Pistol action is used at the college and NBA levels. It is used overseas. It is very hard to defend. This is almost identical to the drag and the lift from the first sequence, but we added the dribble handoff and pistol action. It forces the point guard to create space if the dribble handoff gets blown up. The point guard also has to be ready to lift. By having the point guard lift, it is more game speed like. 3-pt. % will go up by practicing shooting from game situations with pressure. 1. Player 2 sprints to the corner. 2. Player 1 dribbles and executes a dribble hand off to Player 2. 3. Player 1 drifts to the corner. 4. Player 4 sprints to set a screen for Player 2. (Diagram 1) 5. Player 4 rolls to the basket immediately, and Player 2 passes it to Player 4 going to the basket. 6. While Player 4 is attacking the basket, Player 1 drifts towards the top of the key. (Diagram 2) 7. Player 3 passes to Player 1 for a 3-point shot attempt. Made by Breakthrough Basketball